> ## Documentation Index
> Fetch the complete documentation index at: https://hyperframes-feat-thread-message-stack.mintlify.site/llms.txt
> Use this file to discover all available pages before exploring further.
# Apply media effects
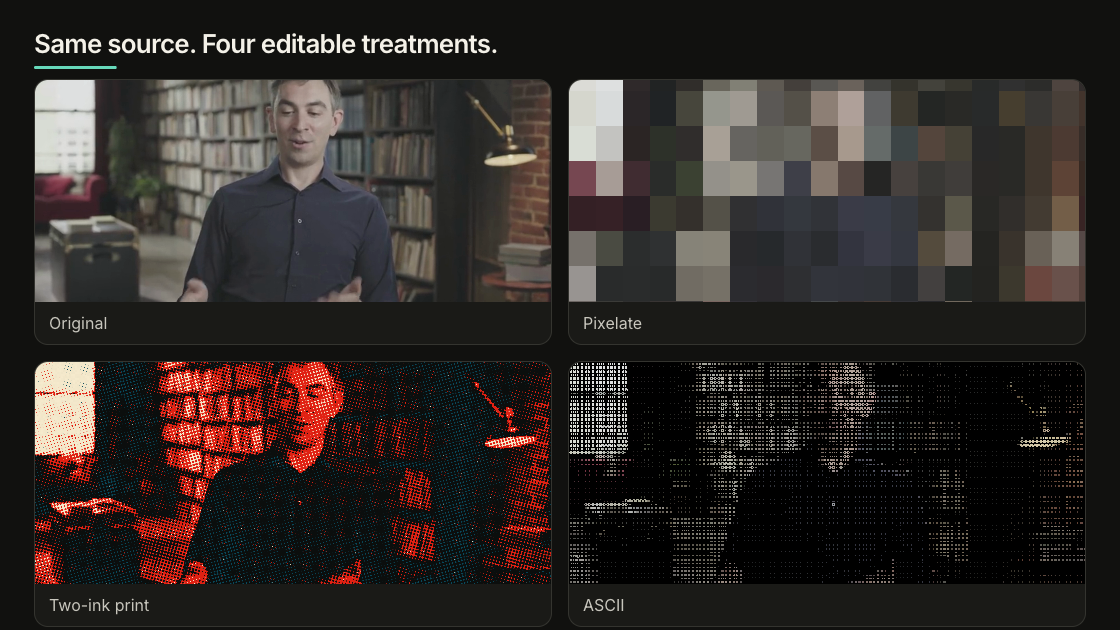
> Apply editable blur, bloom, retro, print, glitch, and art treatments to images and video.
Media effects transform a selected image or video without baking a new source
file. They stay editable in Studio and render from the same project data.
 ## Choose the effect
| Intent | Start with |
| ------------------------------------------------------- | ---------------------------------- |
| Soften, conceal, or lift bright areas | Blur, Pixelate, or Bloom |
| Add tape, film, CRT, or digital damage | Retro & Glitch |
| Turn media into dots, ink, or a limited palette | Print |
| Create ASCII, engraving, crosshatch, or painted media | Art |
| Add grain or darkened edges | Grain or Vignette in Color Grading |
| Add a HUD, light leak, flash, or freeze-frame treatment | A [Catalog](/catalog) overlay |
Effects apply to the complete selected media element. They do not track a face,
screen, or object. Isolate a region into its own cropped or masked media layer
when only that region should change.
## Try effects in Studio
Select an image or video and open **Effects** in the Inspector. The effect
browser is grouped into:
* **Essentials:** Blur, Pixelate, Bloom
* **Retro & Glitch:** Chroma Softening, Tape Damage, Film Artifacts, Scanlines,
CRT Curvature, Channel Separation, Digital Glitch
* **Print:** Halftone, Two-Ink Print, Ordered Dither, Mono Screen
* **Art:** ASCII, Engraving, Crosshatch, Kuwahara Paint
Choose one effect for the job, adjust its controls, then play or scrub the
beginning, middle, and end. Some effects are much more expensive to render than
others, especially Blur, Bloom, and Kuwahara Paint across large media layers.
## Ask the agent
Describe the result instead of guessing control values:
```text theme={null}
Make this product clip feel like a clean two-ink editorial print.
Keep the product shape and label readable.
```
The agent can inspect the live capability catalog before editing:
```bash theme={null}
npx hyperframes media-treatment --capabilities --json
npx hyperframes media-treatment --capability twoInkPrint --json
```
Then it can apply a validated patch:
```bash theme={null}
npx hyperframes media-treatment \
--selector '#product' \
--grading '{"preset":"two-ink-print"}' \
--apply --json
```
Use `--dry-run` to inspect the exact mutation without writing, `--analyze` for
bounded source measurements and a suggested primary correction, or `--clear`
to remove the selected treatment. The command writes the same
`data-color-grading` contract that Studio uses.
## Keep the treatment useful
* Use blur or pixelation for a real reveal, focus shift, or privacy need.
* Use a named stylization strongly enough to read; keep ordinary correction
restrained.
* Compare against the original and inspect representative rendered frames.
* Remove the treatment when it competes with the story.
## Performance and delivery
Several overlapping, full-frame treated layers can slow preview and rendering,
especially at 4K. Simplify the stack or pre-render a finished layer when
playback drops frames.
Effects use the SDR/Rec.709 shader pipeline. Native HDR delivery preserves HDR
source pixels through a separate path, so these SDR effects do not appear on
native HDR layers. Convert or tone-map to SDR when the effect must appear in
the final result.
Project-local media is the reliable default. Remote media must allow browser
pixel access through compatible CORS headers.
The [Color Grading guide](/guides/color-grading) covers correction, wheels,
curves, selective color, finishing, and LUTs. The [HTML
schema](/reference/html-schema#color-grading-and-media-effects) contains the
persistence contract.
## Related topics
* [Color grade images and footage](/guides/color-grading)
* [Use images and video](/guides/video-components)
* [Browse ready-made visual effects](/catalog)
## Choose the effect
| Intent | Start with |
| ------------------------------------------------------- | ---------------------------------- |
| Soften, conceal, or lift bright areas | Blur, Pixelate, or Bloom |
| Add tape, film, CRT, or digital damage | Retro & Glitch |
| Turn media into dots, ink, or a limited palette | Print |
| Create ASCII, engraving, crosshatch, or painted media | Art |
| Add grain or darkened edges | Grain or Vignette in Color Grading |
| Add a HUD, light leak, flash, or freeze-frame treatment | A [Catalog](/catalog) overlay |
Effects apply to the complete selected media element. They do not track a face,
screen, or object. Isolate a region into its own cropped or masked media layer
when only that region should change.
## Try effects in Studio
Select an image or video and open **Effects** in the Inspector. The effect
browser is grouped into:
* **Essentials:** Blur, Pixelate, Bloom
* **Retro & Glitch:** Chroma Softening, Tape Damage, Film Artifacts, Scanlines,
CRT Curvature, Channel Separation, Digital Glitch
* **Print:** Halftone, Two-Ink Print, Ordered Dither, Mono Screen
* **Art:** ASCII, Engraving, Crosshatch, Kuwahara Paint
Choose one effect for the job, adjust its controls, then play or scrub the
beginning, middle, and end. Some effects are much more expensive to render than
others, especially Blur, Bloom, and Kuwahara Paint across large media layers.
## Ask the agent
Describe the result instead of guessing control values:
```text theme={null}
Make this product clip feel like a clean two-ink editorial print.
Keep the product shape and label readable.
```
The agent can inspect the live capability catalog before editing:
```bash theme={null}
npx hyperframes media-treatment --capabilities --json
npx hyperframes media-treatment --capability twoInkPrint --json
```
Then it can apply a validated patch:
```bash theme={null}
npx hyperframes media-treatment \
--selector '#product' \
--grading '{"preset":"two-ink-print"}' \
--apply --json
```
Use `--dry-run` to inspect the exact mutation without writing, `--analyze` for
bounded source measurements and a suggested primary correction, or `--clear`
to remove the selected treatment. The command writes the same
`data-color-grading` contract that Studio uses.
## Keep the treatment useful
* Use blur or pixelation for a real reveal, focus shift, or privacy need.
* Use a named stylization strongly enough to read; keep ordinary correction
restrained.
* Compare against the original and inspect representative rendered frames.
* Remove the treatment when it competes with the story.
## Performance and delivery
Several overlapping, full-frame treated layers can slow preview and rendering,
especially at 4K. Simplify the stack or pre-render a finished layer when
playback drops frames.
Effects use the SDR/Rec.709 shader pipeline. Native HDR delivery preserves HDR
source pixels through a separate path, so these SDR effects do not appear on
native HDR layers. Convert or tone-map to SDR when the effect must appear in
the final result.
Project-local media is the reliable default. Remote media must allow browser
pixel access through compatible CORS headers.
The [Color Grading guide](/guides/color-grading) covers correction, wheels,
curves, selective color, finishing, and LUTs. The [HTML
schema](/reference/html-schema#color-grading-and-media-effects) contains the
persistence contract.
## Related topics
* [Color grade images and footage](/guides/color-grading)
* [Use images and video](/guides/video-components)
* [Browse ready-made visual effects](/catalog)